Manage Locations
Banks or Credit Unions can manage the ATM and branch details available in the Locate Us section of the mobile and online banking applications from Spotlight instead of using third-party map service providers like Google Maps. The demo apps available on the store are integrated with Google Maps for better demonstration.
Use this feature to add and manage the branch / ATM records. This feature is applicable to the users who have the required permissions to access it.
Menu path: Application Content Management > Locations
The app displays the list of branches or ATMs with their current status (active or inactive). As a bank staff member, you can do the following:
- View the list of branches or ATMs with current status.
- Add a branch or ATM and add services to it.
- Upload a CSV file with locations.
- Download a template for importing locations.
- View details of a branch or ATM.
- Edit branch or ATM details.
- Search for a branch or ATM.
- Change a branch or ATM status (active, deactivate, and set offline).
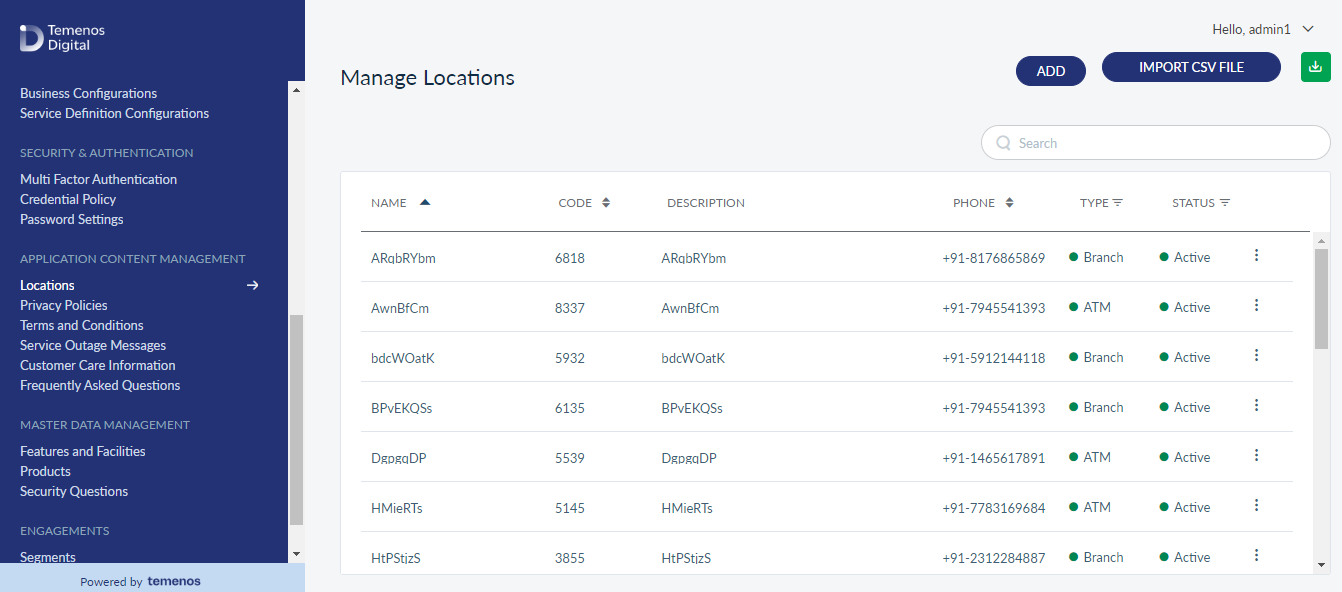
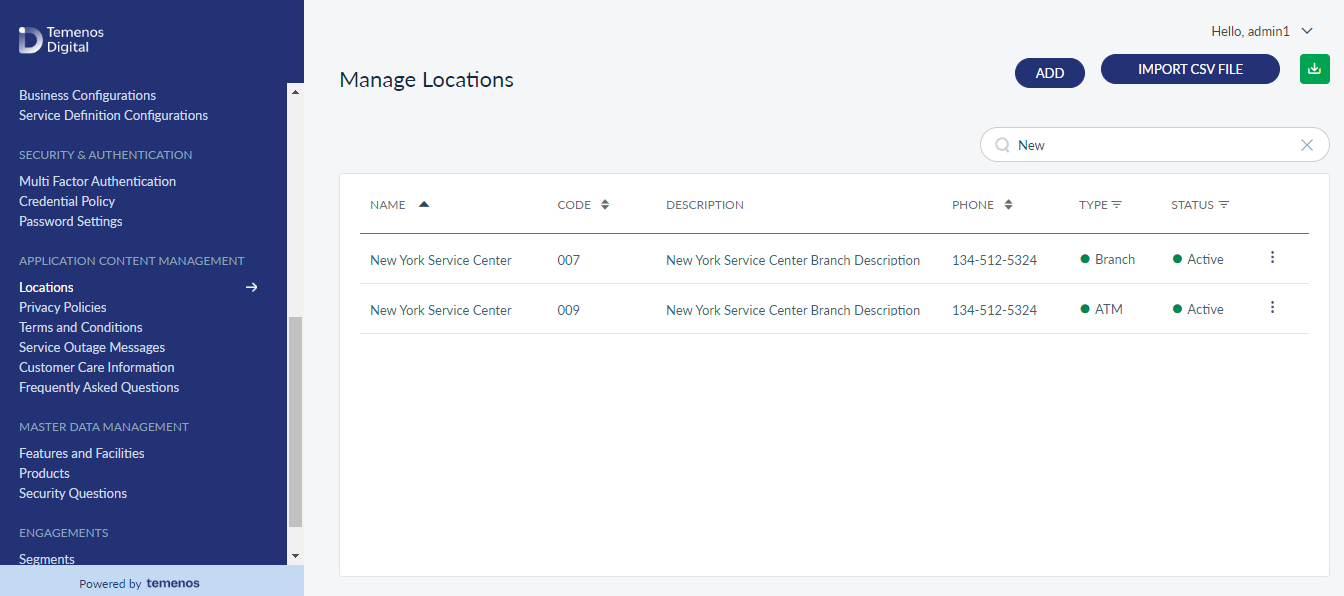
View Branch or ATM List
The app displays the list of branches or ATMs with their current status.
Menu path: Application Content Management > Locations
The branch and ATM list is represented as rows with the following details: Name, Code, Description, Phone, Type, and Status.
Sort the list based on any of the columns by using the sort icon and filter the list items by Type or Status using the filter icon.
User can do the following:
- Click ADD to add a branch or ATM.
- Click a branch or ATM record to view the detailed information.
- Click Import CSV File to import a branch or ATM list. To get the template for providing the information for the required fields, click Download Template link on Import Locations pop-up.
- Click the download icon to download the displayed list of records as an excel file.
- Click the contextual menu available on each row to open and do the following. Click the menu again to close it.
- Search for any branch or ATM.
Add a Branch or ATM
Use the feature to add a new branch or ATM record and their services.
Menu path: Application Content Management > Locations > ADD
- The Add screen comprises of two tabs to capture the required information - Location Details and List of Services.
Location Details
The details on this tab are separated into three different sections - Details, Address, and Operation Time. Add the details under each section as per the guidelines:
- Details
- Select the branch code from the list or enter the code. This is a mandatory field and cannot be a negative number.
- Enter a unique branch name. This is a mandatory field and allows up to 100 characters.
- Enter a display name. This is a mandatory field and allows up to 100 characters.
- Enter a valid Email ID.
- Select the Type: Bank or ATM. By default, Bank is selected.
- Use the slider to set if the bank is the Active Branch. By default, the slider is set as an active branch.
- Use the slider to set if the bank is the Main Branch. By default, the slider is not set as the main branch. This field is applicable only if the selected Type is a Bank.
- Select Bank Type: Physical or Mobile. This field is applicable only if the selected Type is a Bank.
- Select the Customer Segment check boxes as applicable: Small Business User, Micro Business User, and Retail Customer. This field is applicable only if the selected Type is a Bank.
- Select the Supported Currency check boxes as applicable: EUR, GBP, and USD. This field is applicable only if the selected Type is an ATM.
- Description: Write a short description of the branch that is being added.
- Address
- Street Address
- Country
- State
- City
- Zip Code. All fields are mandatory.
- Geo-Location: Select the Latitude and Longitude from the respective lists. These fields support positive and negative numbers up to six decimal digits. The latitude range is in between -90 to +90; the longitude range is in between -180 to +180. This is a mandatory field.
- Enter a valid Phone Number with ISD (international subscriber dialing) code. This is a mandatory field.
- Operation Time
- Weekdays: Select the From and To timings from the respective lists.
- Weekends: Use the slider to set whether or not the bank operates on weekends. By default, it is not selected. Select the appropriate weekend check boxes if the slider is set to true.
- Weekdays: Select the From and To timings from the respective lists.
User can proceed to assign services to the branch or ATM using the Next button or the List of Services tab (this step is optional), or save the branch or ATM details directly. The branch or ATM record is added to the list of branches or ATMs.
User can cancel the process at any time. The changes are not saved.
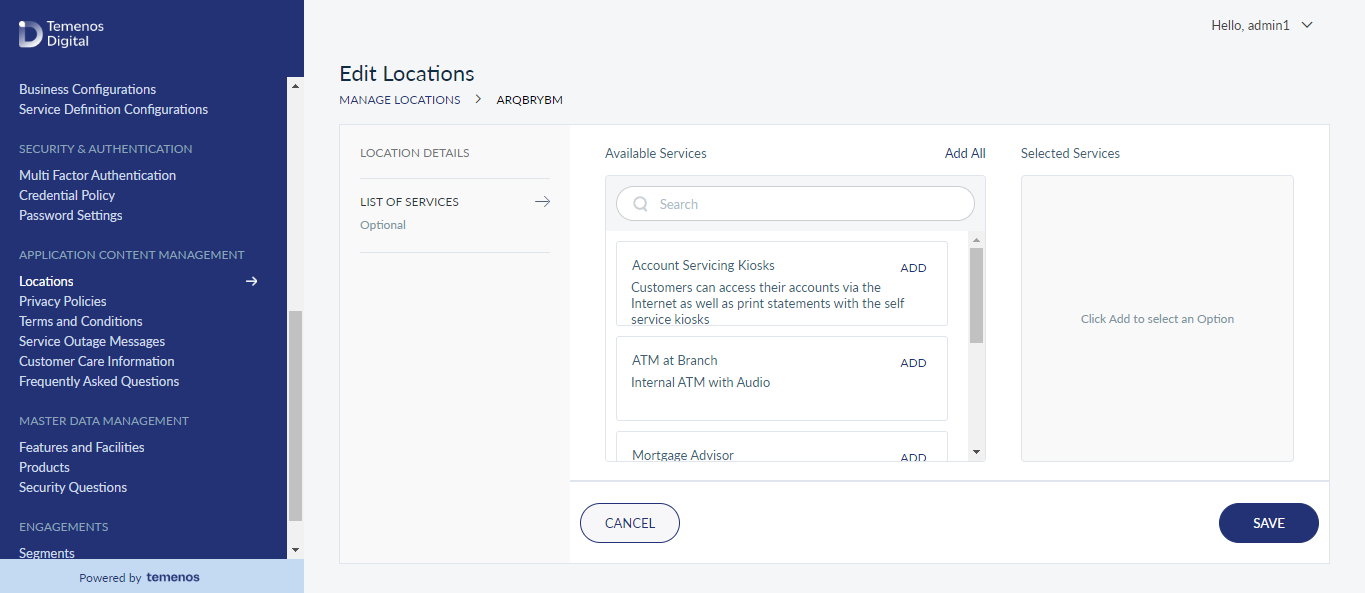
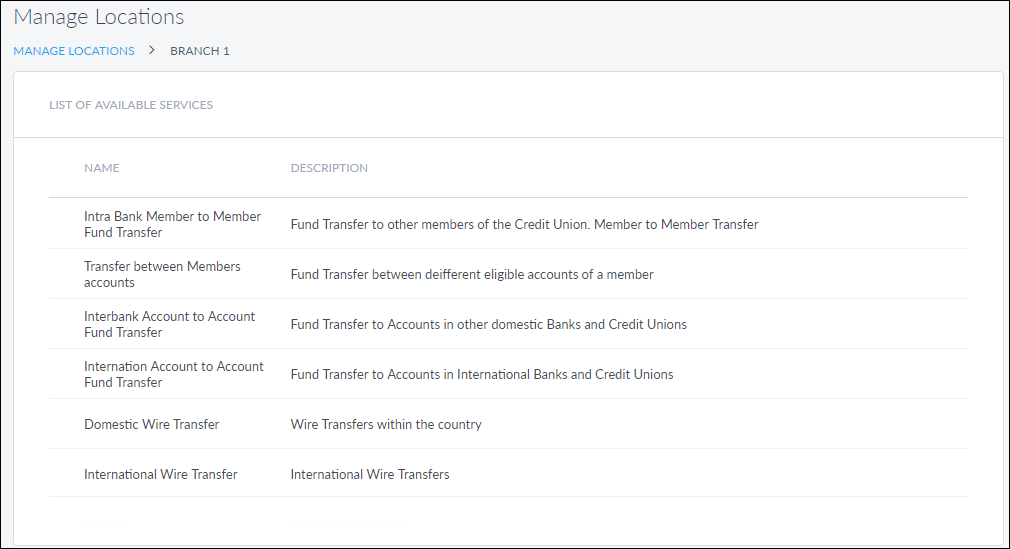
List of Services
This step is optional. The app displays the list of available services. The user can select any number of services available at the branch or ATM and add them to the selected services. Do the following:
- From the list of Available Services, add the required service. Use the Search option to search for any particular service.
- The service is added to the Selected Services list.
- User can remove the service from the selected services list, or click Reset to remove all the services.
- Save the branch or ATM details. The branch or ATM record is added to the list of branch or ATM with the relevant status.
Import Branch or ATM List
User can upload a CSV file to import a list of branches and ATMs. Click the Import CSV File button shown on the top-right of the Manage Locations page. The file format must match with the fields available in the ADD feature.
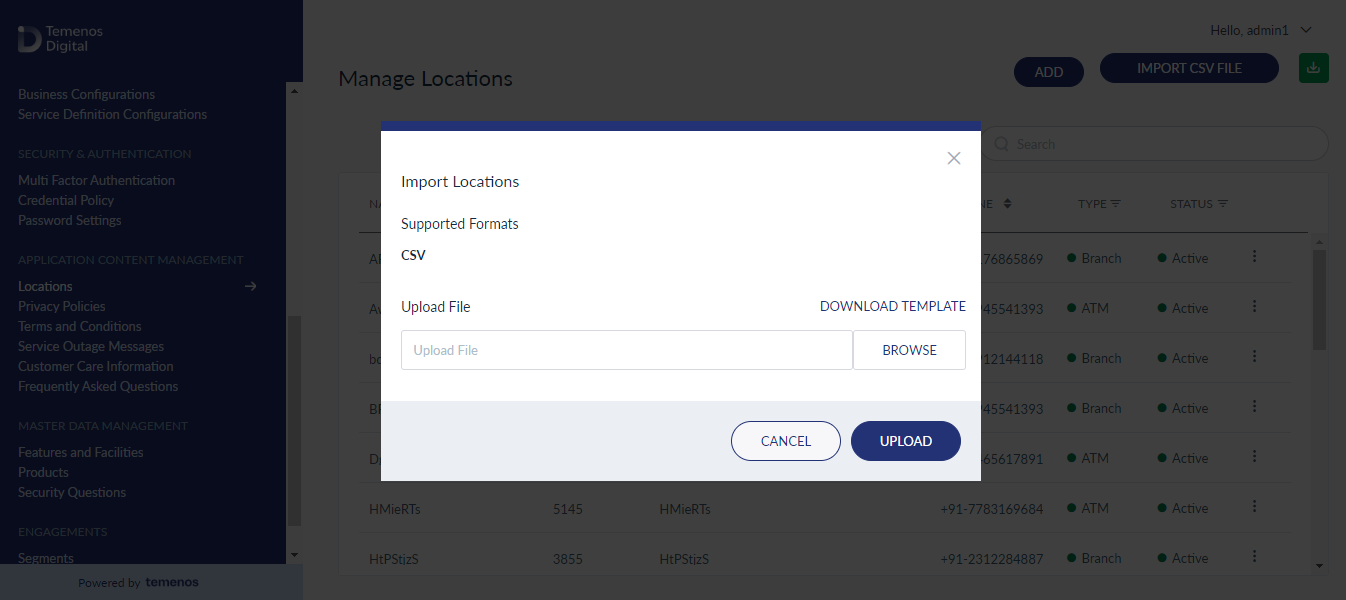
The file format is as follows:
- Code
- Name
- Display Name
- Email ID
- Type (Branch / ATM)
- Status (Active / Inactive)
- Main Branch
- (If Bank) Bank Type (Physical / Mobile)
- (If Bank) Customer Segment
- (If ATM) Supported Currency
- Description
- Street Address
- City
- Region
- Zipcode
- Country
- Phone Number
- Latitude
- Longitude
- Weekday timings from
- Weekday
- Weekend
- (If yes) Weekend days
- (If yes) Weekend (time - from)
- (If yes) Weekend (time - to)
- List of Facilities
After the file is uploaded, the app shows a log with the following details:
- Number of successful records uploaded.
- Number of records failed to upload with the associated error message.
- Total number of records in the file.
After the file is successfully imported, all the records in the file are added to the list of records.
Download Template
User can download the template used for uploading location details. The ready-to-use template (template sample) with the required field heading will help the user to enter the details accordingly and upload it instantly.
- A new record is created only if all the mandatory fields are entered.
- A new record is not created for duplicate entries.
Download Locations List
Click the download icon on the top-right of Manage Location page. The template will be downloaded to a local folder.
View Branch or ATM details
- This feature shows further details of the selected branch or ATM record and edit the details if required.
- Menu path: Application Content Management > Locations > Click a branch or ATM row
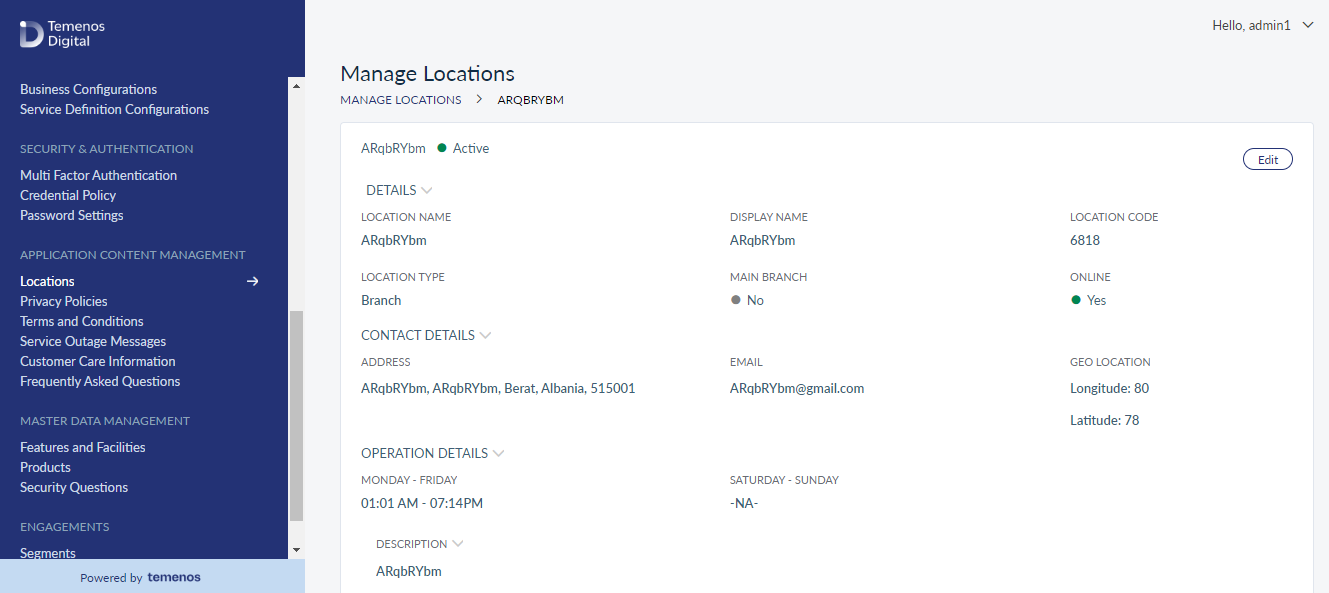
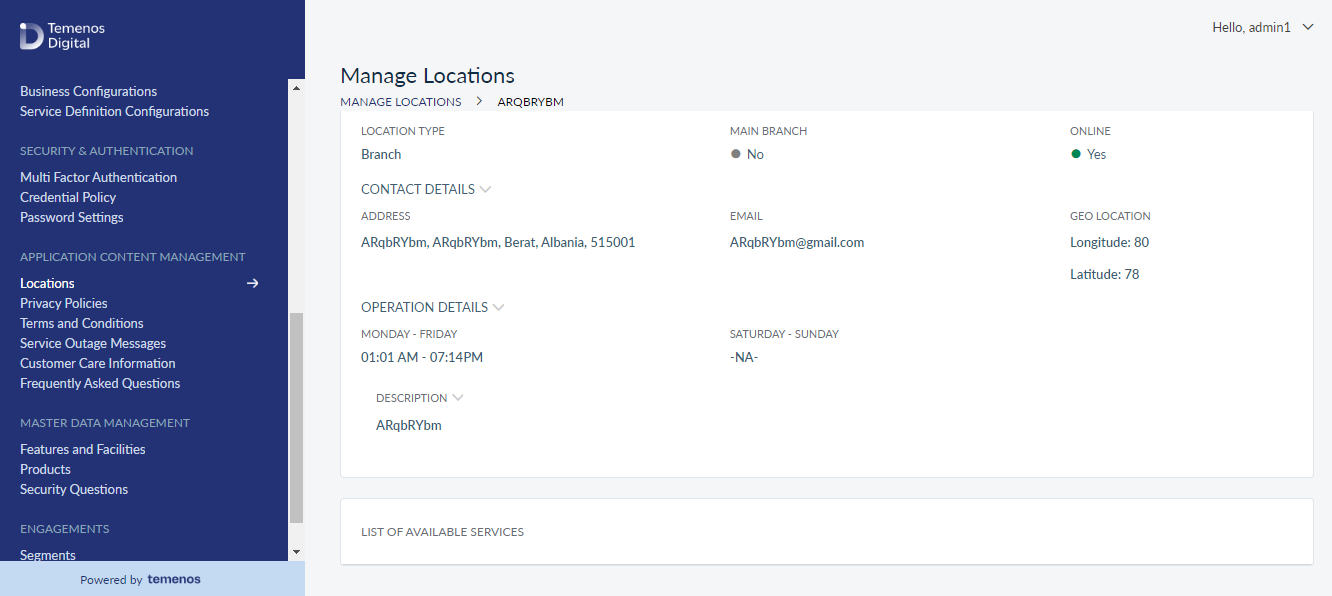
The app displays the following details on the View screen:
- Location Name
- Display Name
- Location Code
- Location Type
- Main Branch
- Online
- Address
- Email Id
- Geo Location
- Operation Details
Edit Branch or ATM Details
Use the feature to edit the details of the selected branch or ATM record.
Menu path: Application Content Management > Locations > Branch or ATM record screen > Edit
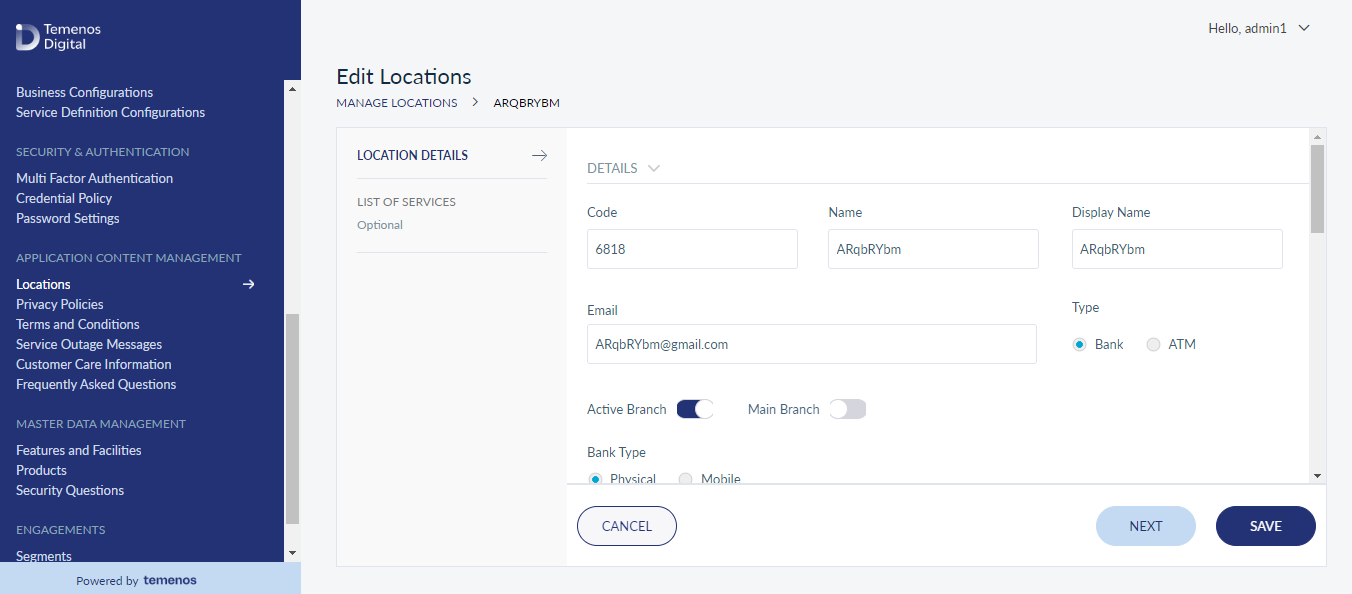
The edit screen is similar to the add a branch or ATM screen, and allows the user to modify the details of the branch or ATM. User can make the changes as per the guidelines mentioned in Locations Details and List of Services. Save the details.
User can cancel the process at any time. The changes are not saved.
Search for a Branch or ATM
Use the search option to search for a particular branch or ATM using search criteria. User can also download the list of matching records as an excel file if required.
Menu path: Application Content Management > Locations > Search
Enter the search keyword (For example - branch name) in full or in part (three or more characters). The app displays the matching records automatically.
Click Download List to download the list of users matching the search criteria as an excel file if required.
Update Branch or ATM Status
Use the feature to update the status of a branch or ATM.
Menu path: Application Content Management > Locations > Contextual menu
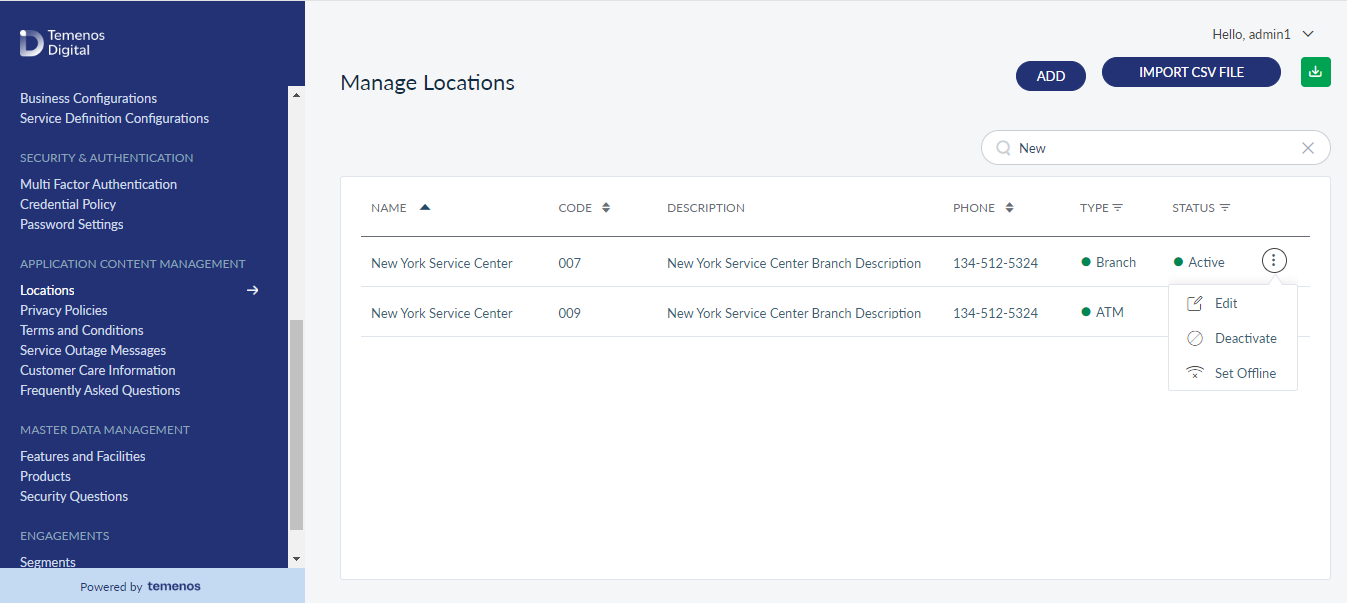
Click the contextual menu available on each row and update the status based on the current status of the branch or ATM. The following statuses are available:
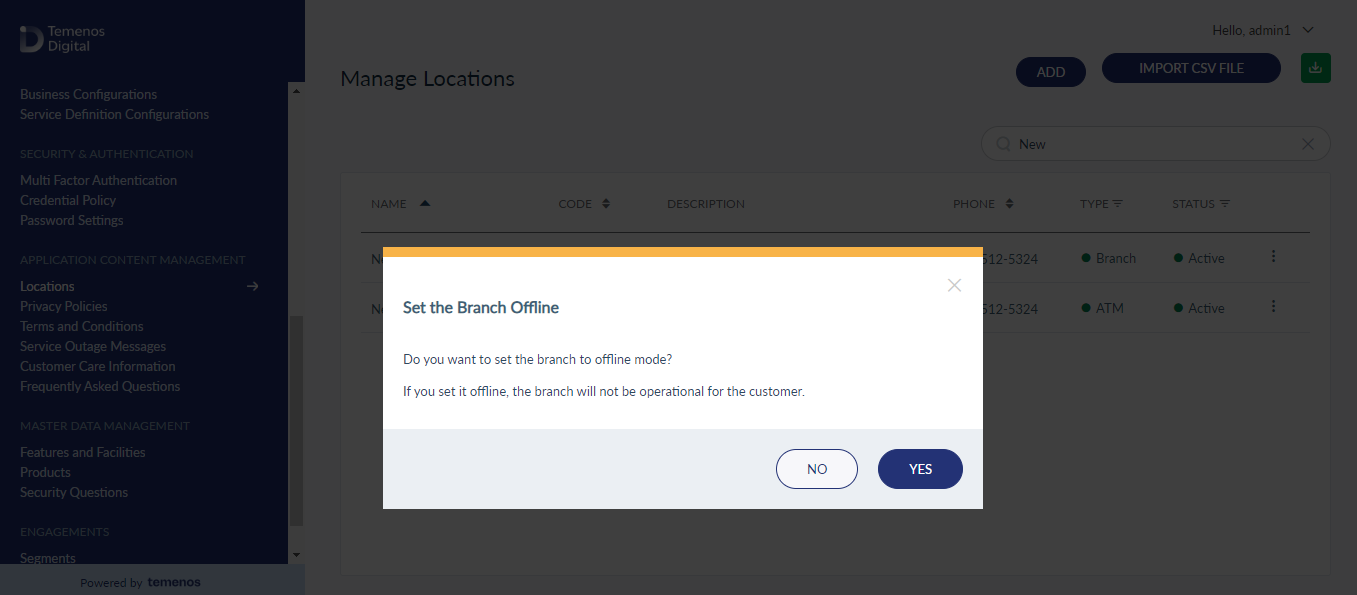
- Deactivate: The branch or ATM will not appear in the list for the customer.
- Set Offline: The branch or ATM will not show operational to the customer.
- For example, if the current status of a branch or ATM is Active, user can either select Deactivate or Set Offline depending on the current status of the branch or ATM.
- On the confirmation screen, confirm the action. The status of the branch or ATM is updated as required.

In this topic